DROPSHIP PANEL USER GUIDE
As much as our Dropship panel is intuitive and easy to use, here are some guidelines to help you unleash its full potential. Please take time to go through the explained steps as you will find them more than useful in the process of fine-tuning your online store.
First thing’s first, log in to your account at http://dropship_dev.cp-dev.com:1080/login
Use the username and password you received in an e-mail we’ve sent you with the subject “Your dropship website has been created”.
Supplier Management
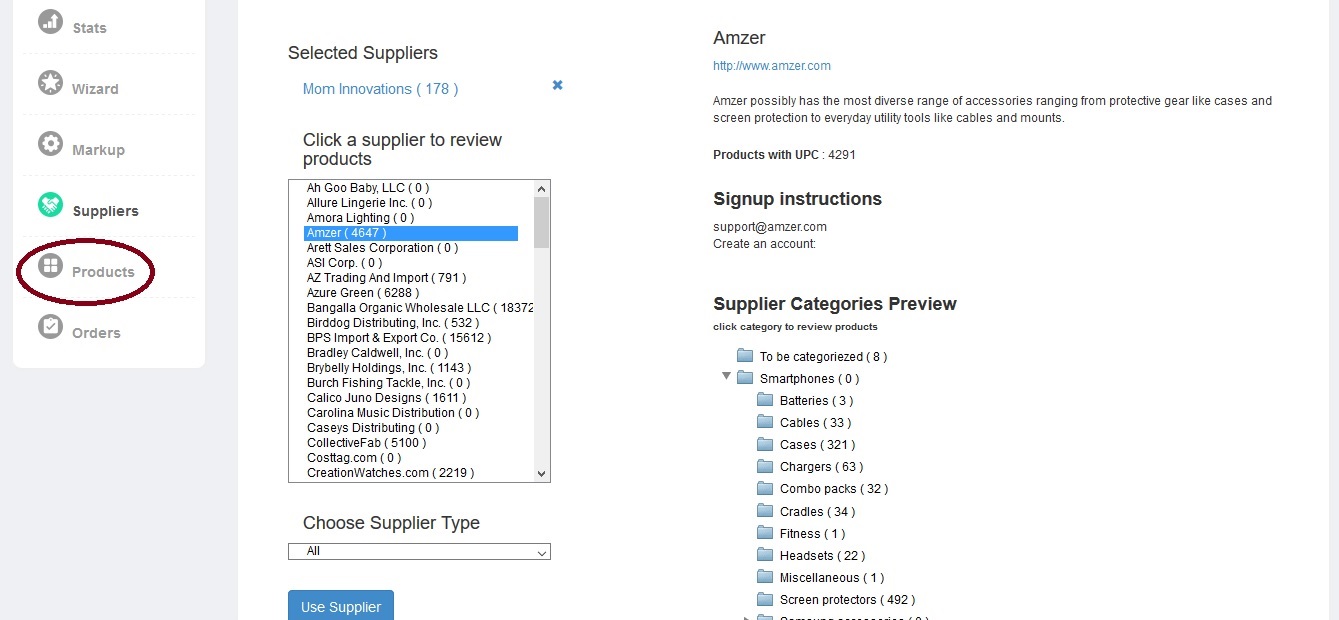
To, add, remove or change a supplier, go to Suppliers by clicking the Suppliers button.
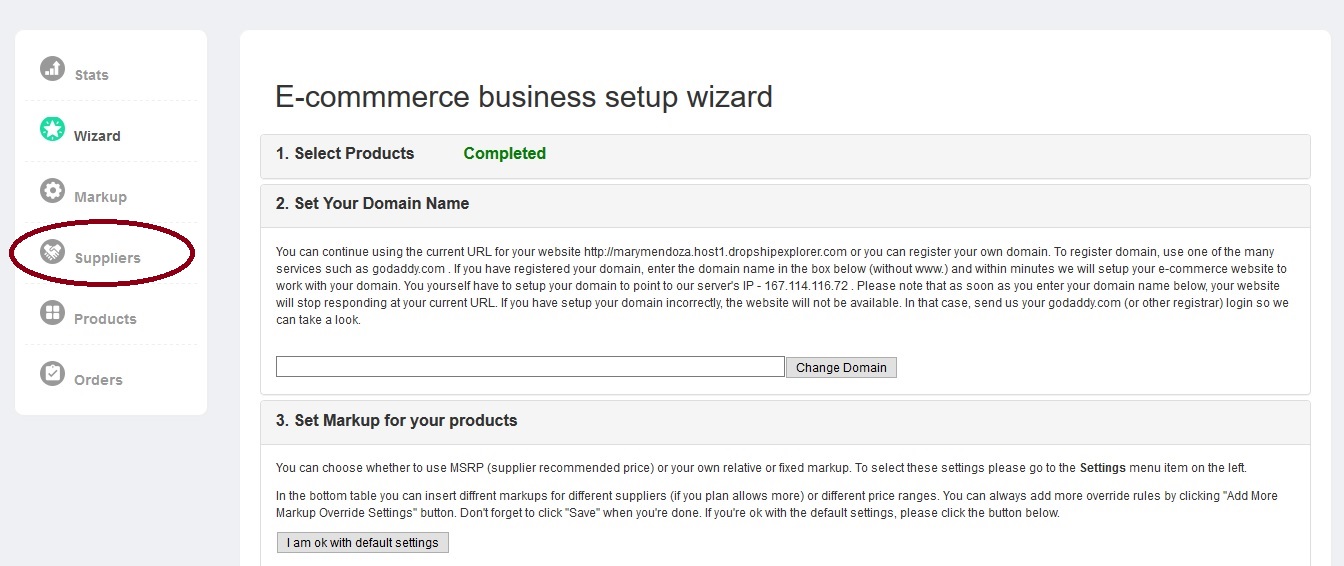
When you click on a certain supplier, on the right side of the screen you’ll be able to see the supplier’s basic information, instructions on how to sign up for an account with the supplier, and a preview of the supplier’s categories.
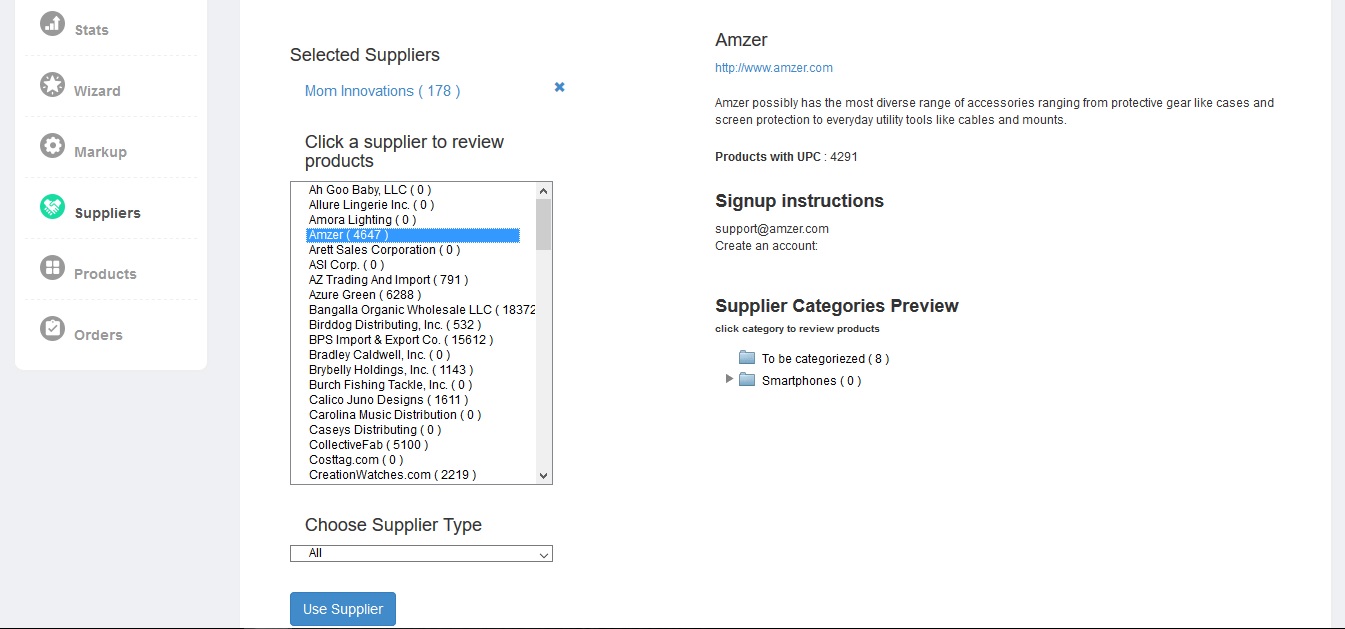
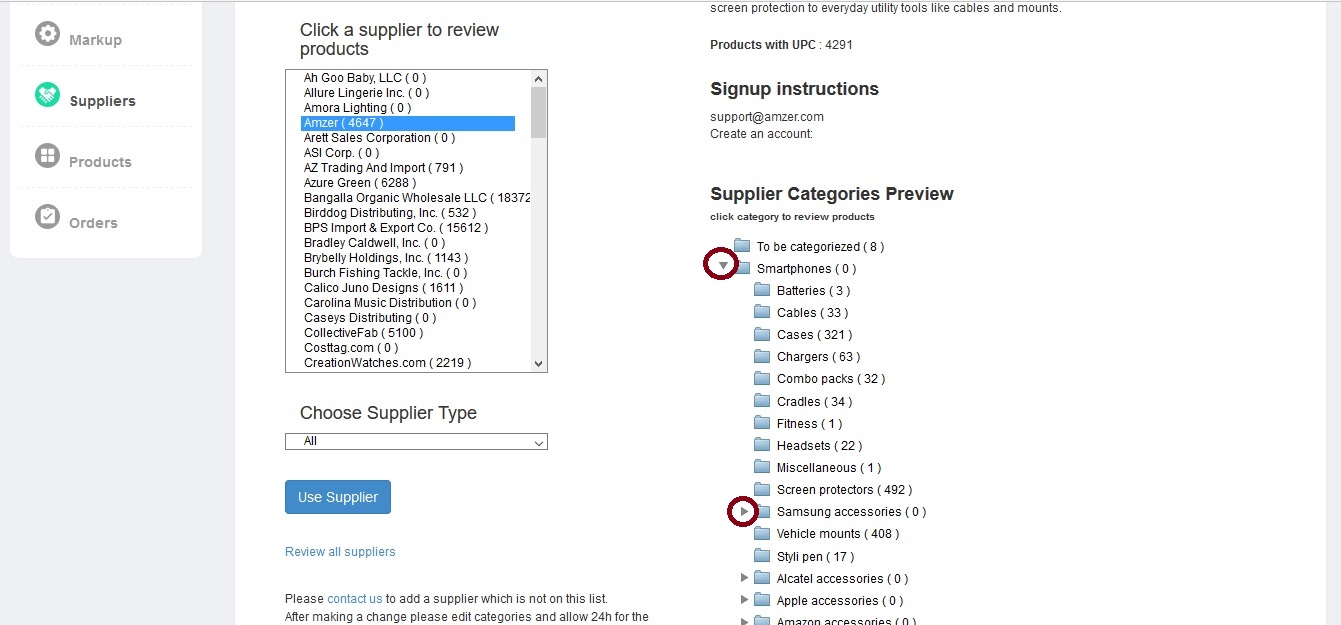
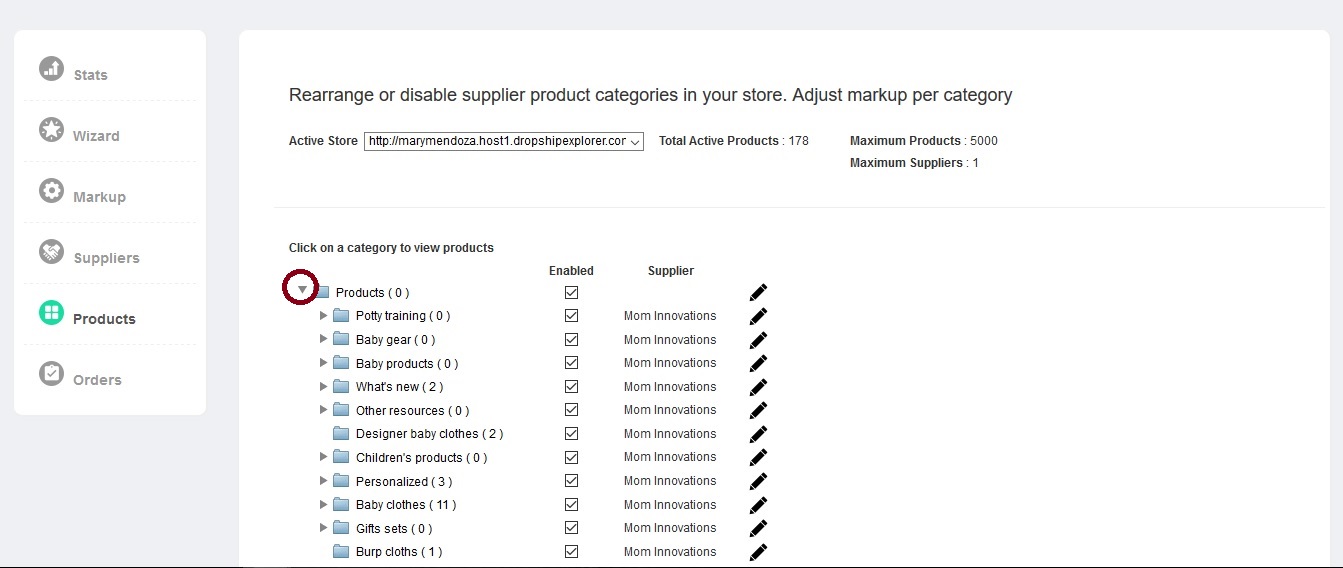
You can also see how many products each of the suppliers in our database has (look at the number next to the supplier’s name). To review how many products each of the supplier’s categories contain, click the little triangle next to the category’s title. The number next to the category title is the number of products in that category. If there’s (0) next to the category title, then there are more subcategories in that category.
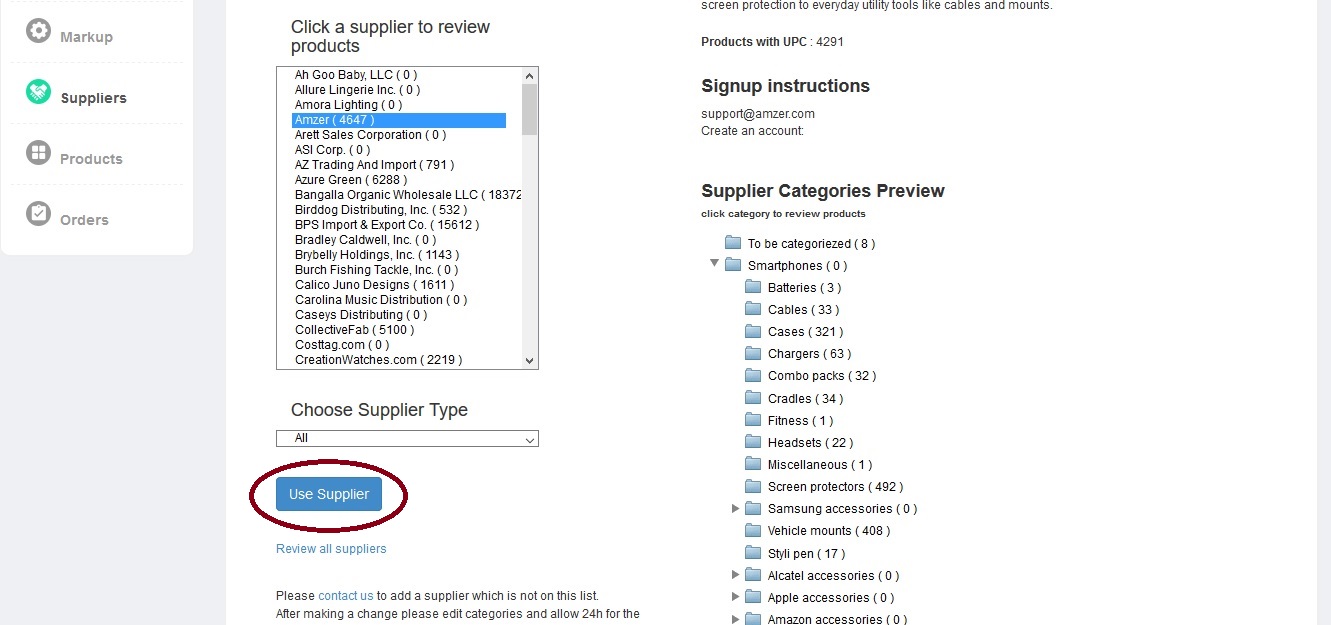
Once you decided on a supplier whose products you want uploaded to your website, click the Use Supplier button.
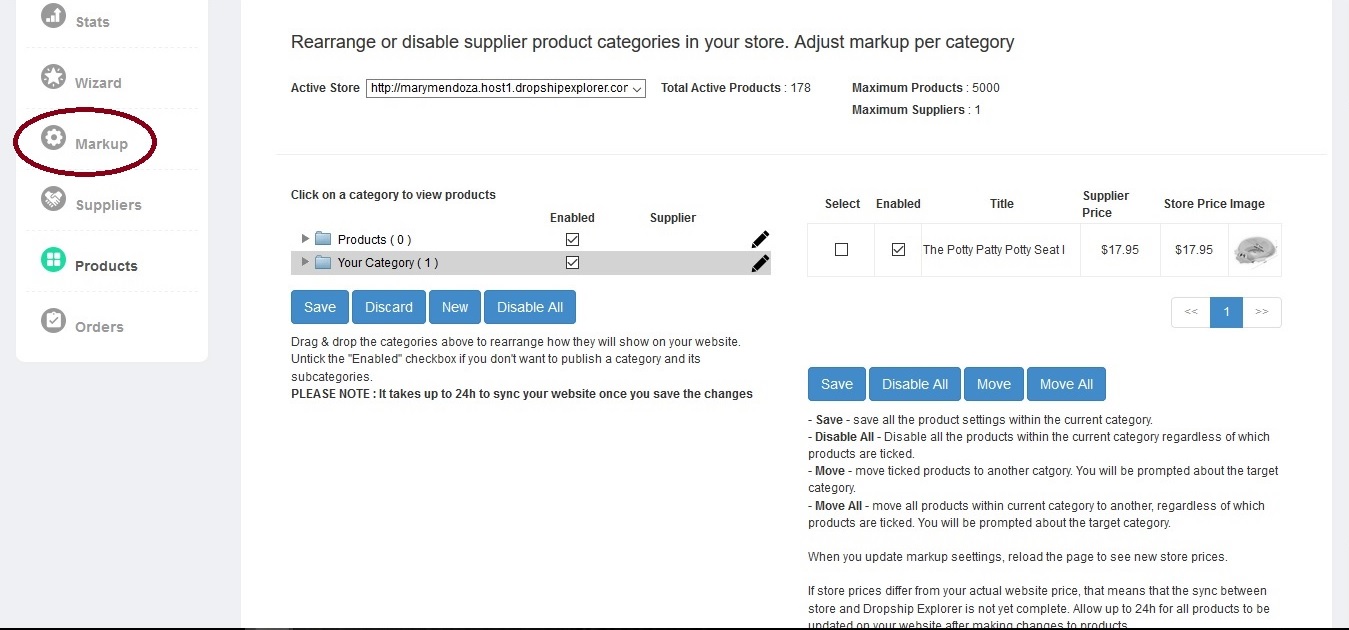
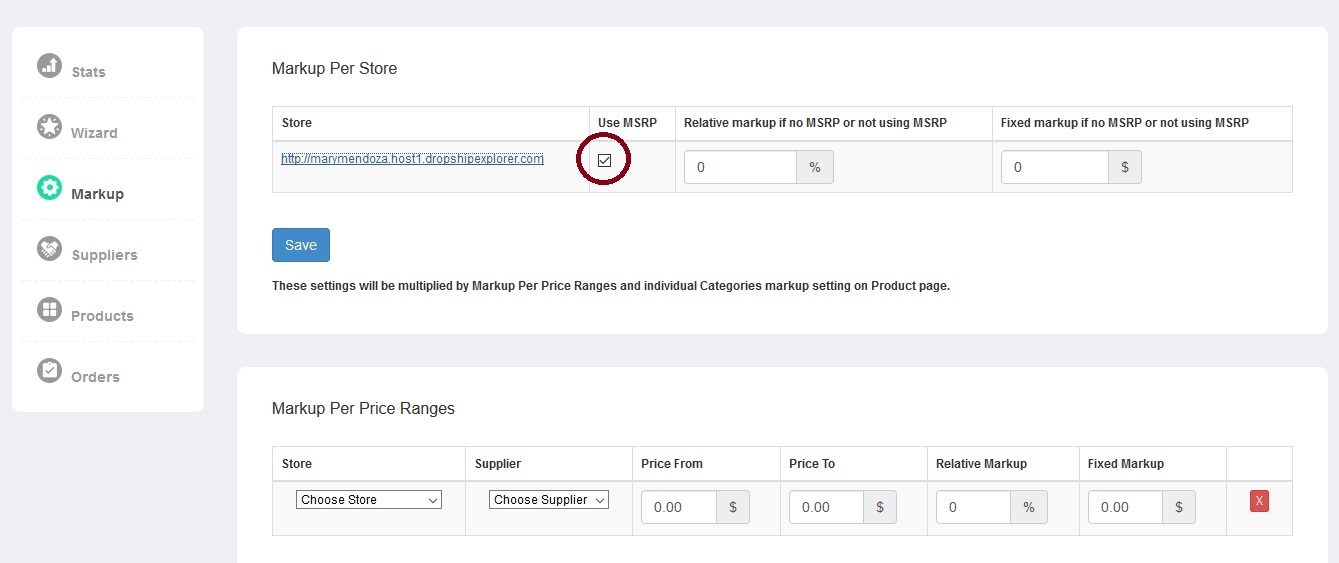
Markup Setup
Please go to the Markup tab.
Markup settings can be applied for an entire store and for a particular product price range.
Setting Markup for the Entire Store
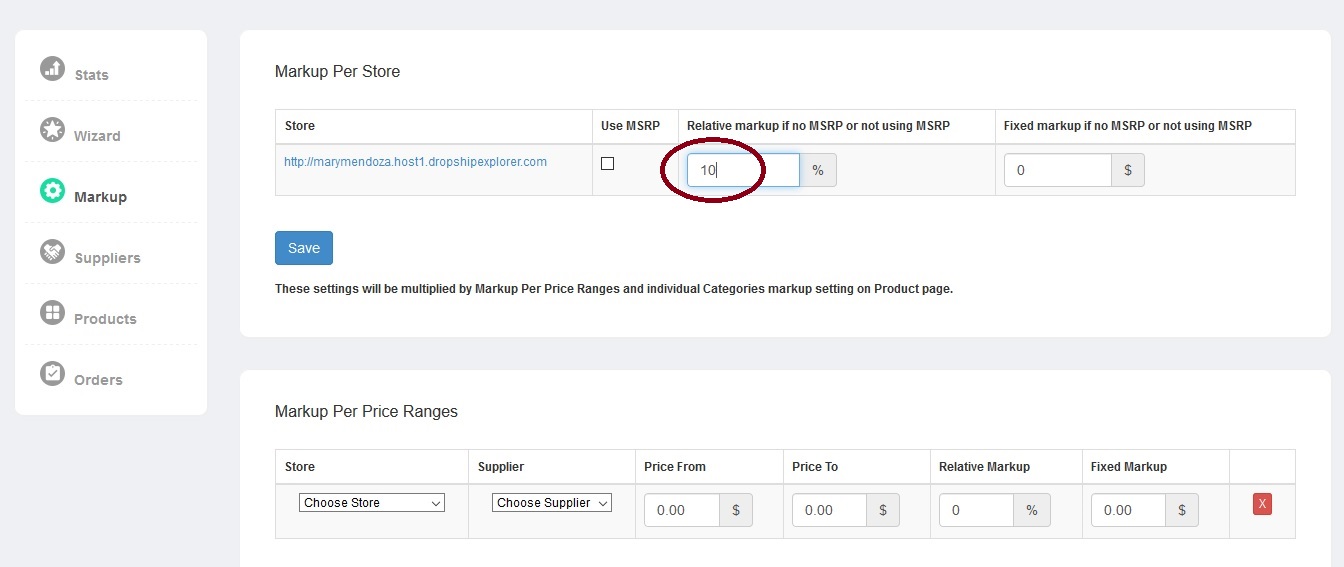
The Markup Per Store allows you to choose between three options:
- 1. use a manufacturer's suggested retail price (MSRP) by marking check box Use MSRP
- 2. increase prices for the entire website by a certain percent, for example you can apply a 10% markup to all products by entering number 10 in the box Relative markup if no MSRP or not using MSRP
- 3. increase prices for the entire website by a certain fixed amount, for example, you can add a $10 markup to the store by entering number 10 in the box Fixed markup if no MSRP or not using MSRP.
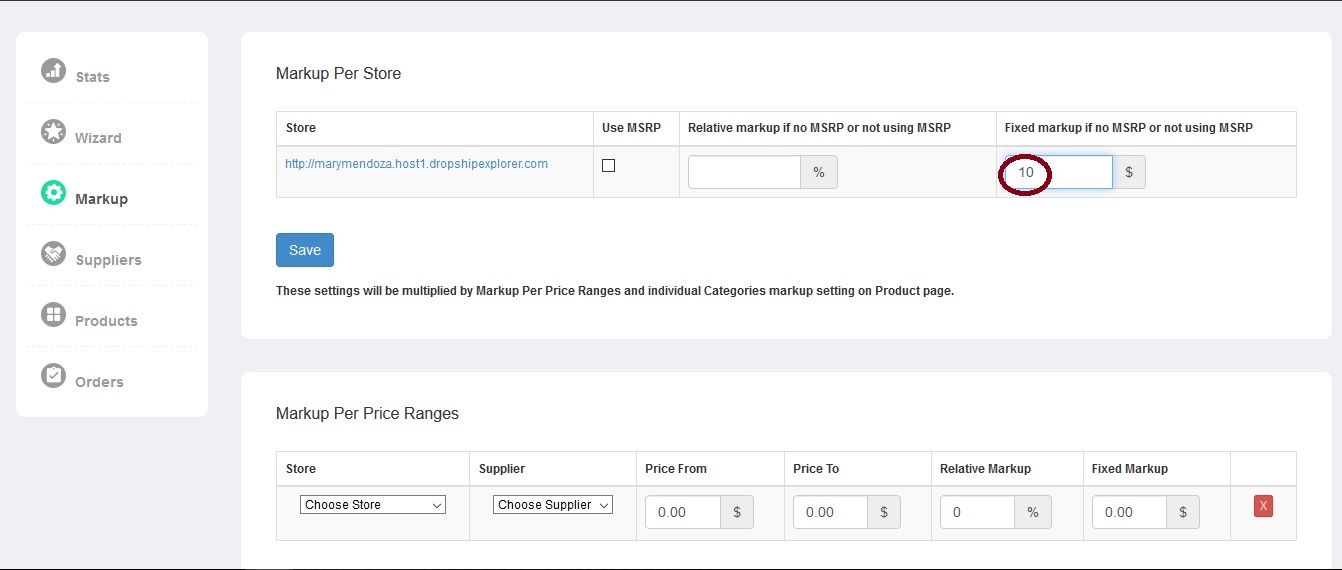
Just remember to click the Save button after you finish with the markup setup, for the changes to take effect. You can also combine Relative and Fixed markup, by setting both of them. That way you can increase Supplier price by a certain percentage, and by a certain fixed dollar amount.
Setting Markup per Price Range
You can also set markup for a certain price range under Markup per Price Ranges. First, choose your store from the drop down menu.
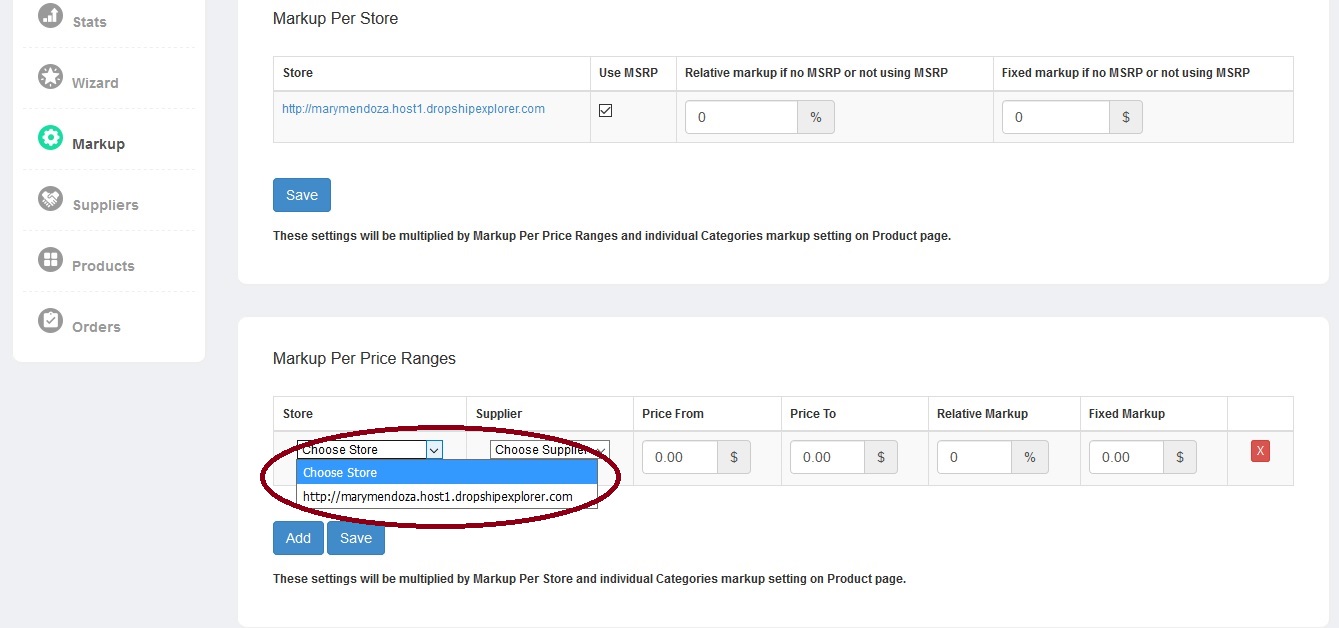
If you have more than one store (i.e. more than one e-commerce website on our servers), you can choose between them and set markup per price range for each of them.
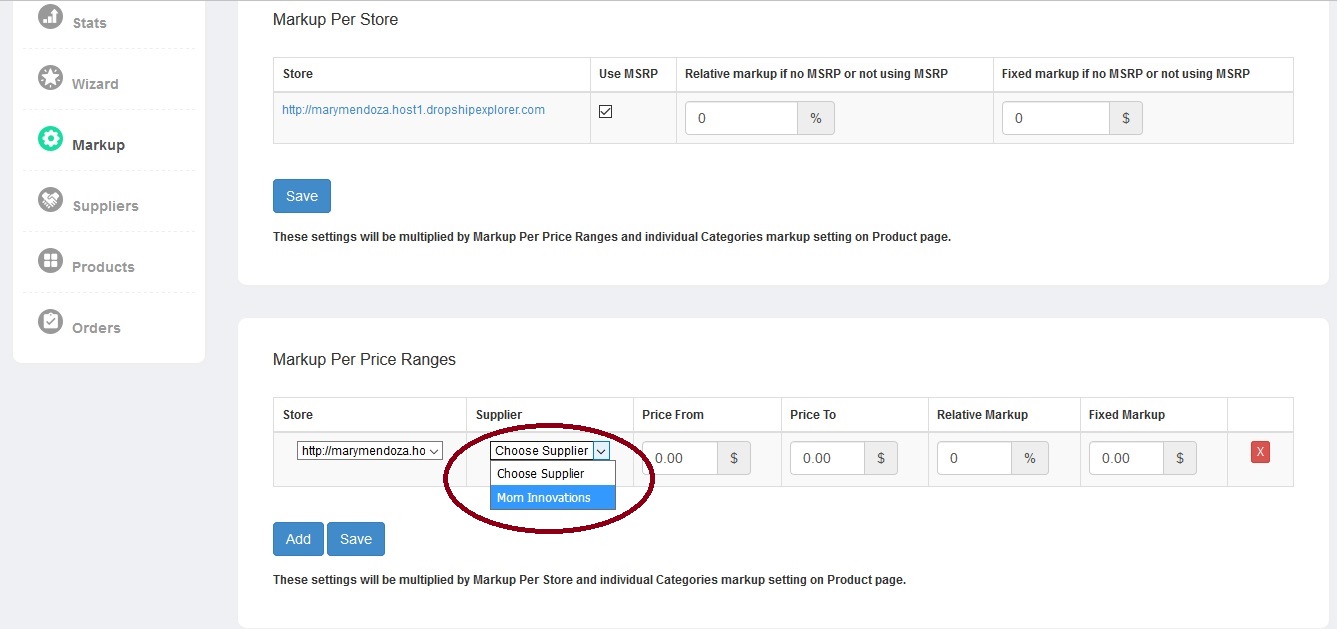
After you chose your store, choose a supplier for which you want to set markup per price range. If you have more than one supplier, choose one and repeat this and following steps for each one.
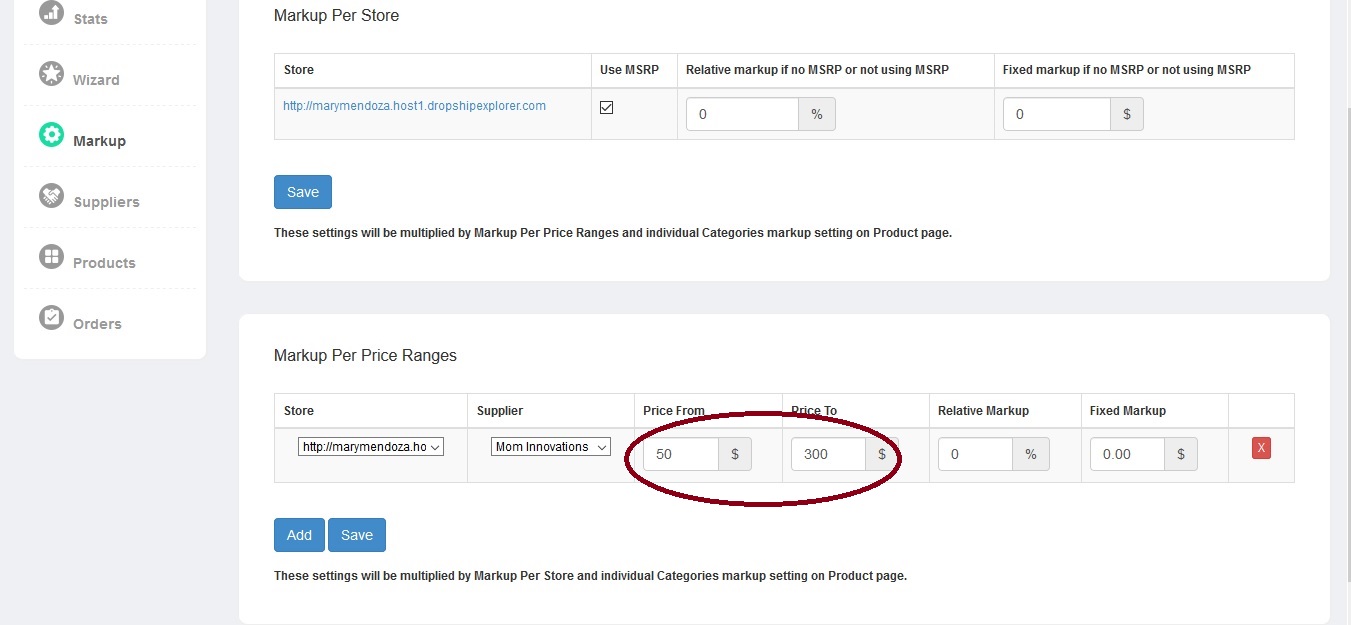
Next, enter price range for which you want to set markup.
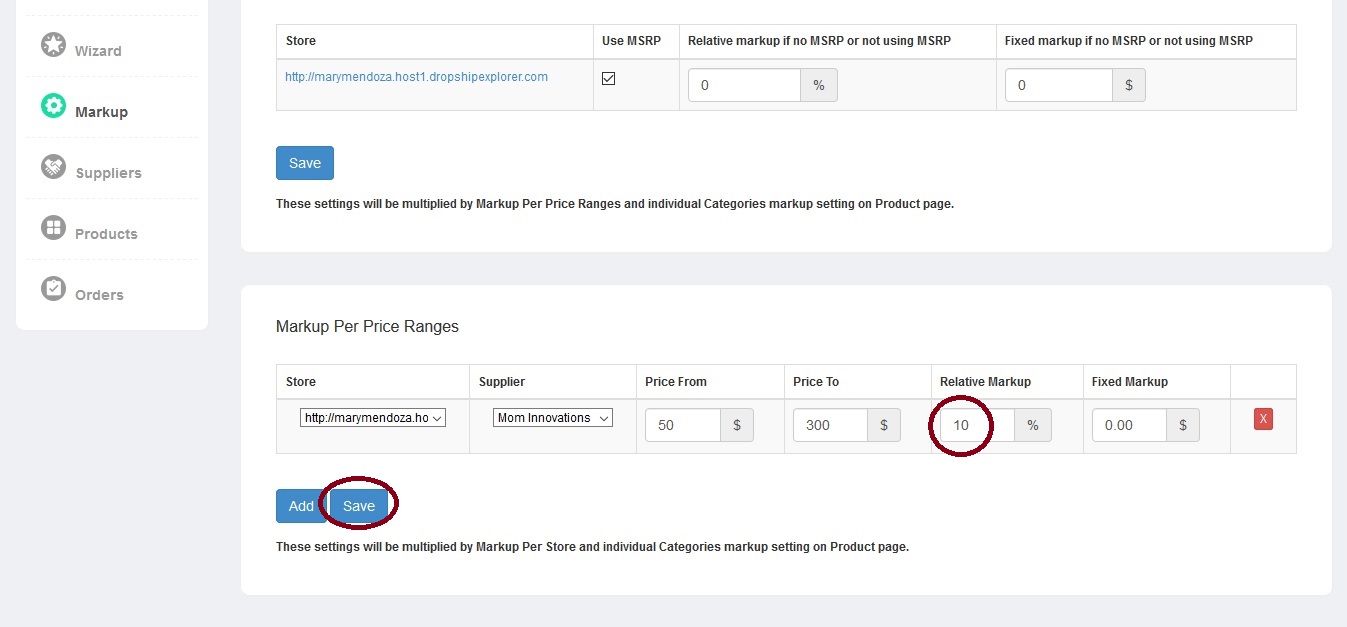
The last step is setting markup. To increase prices for the price range you entered by 10%, for example, enter the number 10 in the box “Relative Markup” and click the Save button.
To increase prices for the price range you entered by $10, for example, enter the number 10 in the box “Fixed Markup” and click the Save button.
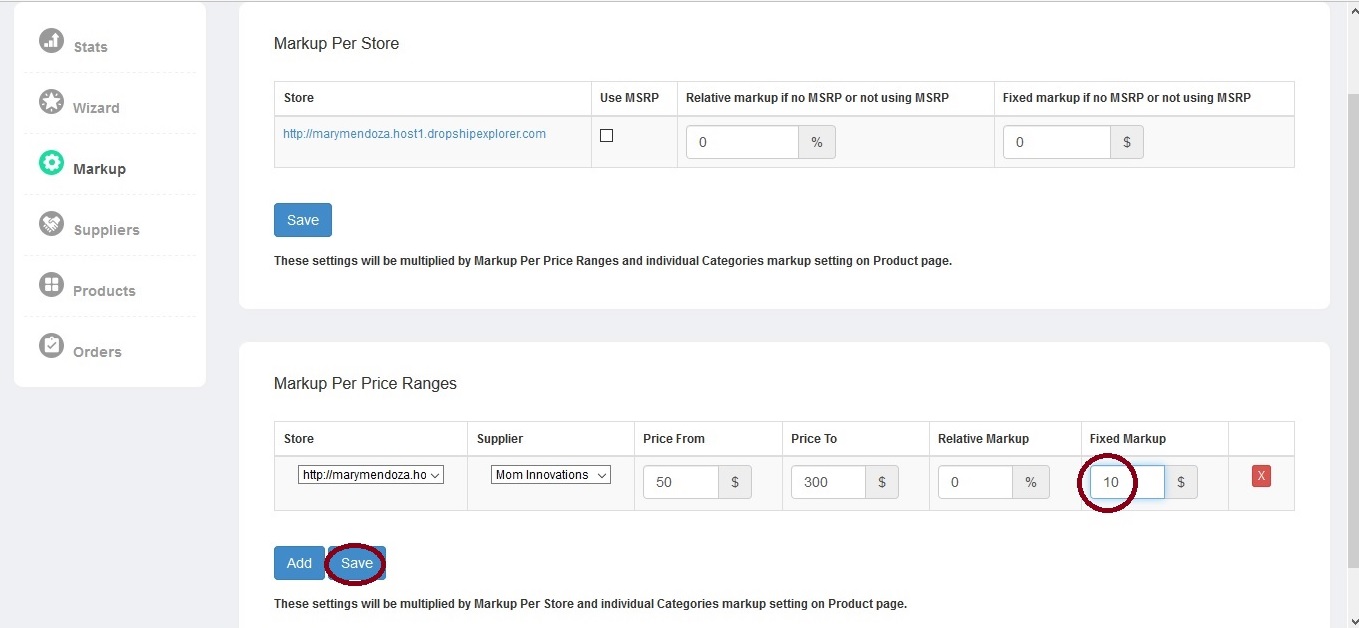
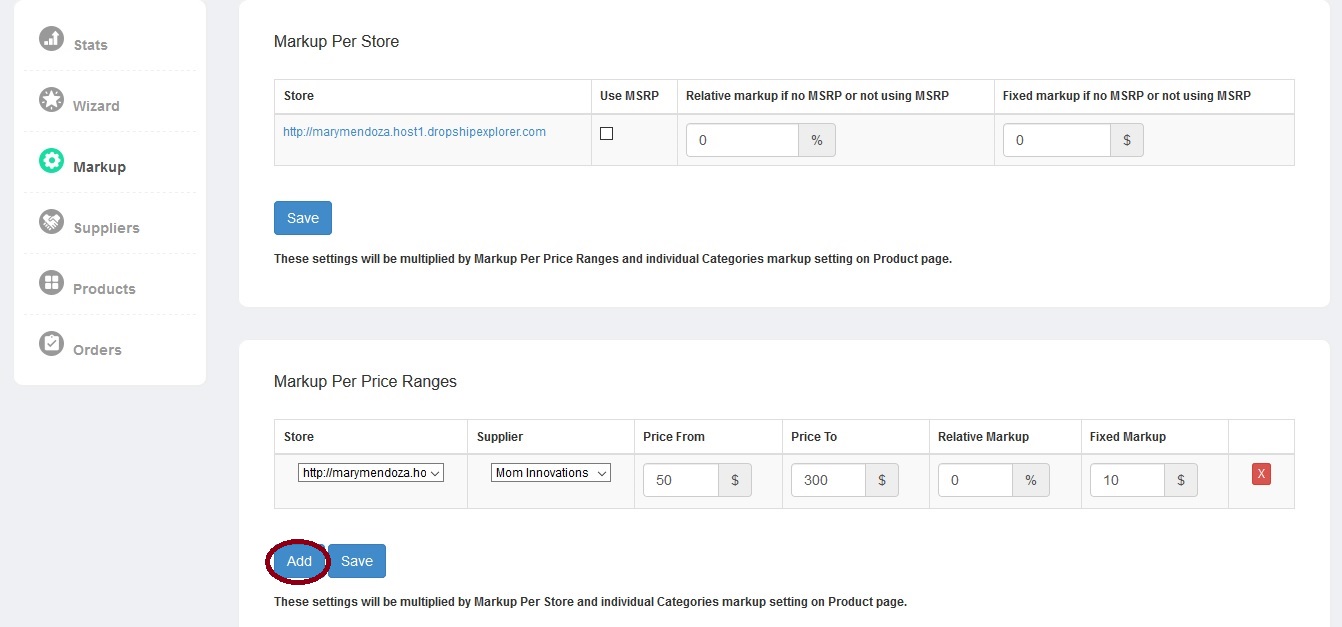
There can be more than one markup set. You can set markup for different price ranges, for different suppliers (if you have more than one supplier), and even for different stores (if you have more than one website created by us). To add a new price range just click Add and repeat the process for the markup per price range setup. Don’t forget to click the Save button after you finish.
If Markup per Store and Markup per Price Range are set at the same time, they will be combined. The prices will first be increased by the markup set for the store, then the markup set for the price range will be added to those increased prices. For example, if there’s a relative markup 30% for the store, and 30% for the markup range, the resulting markup will be 69% (1.30*1.3=1.69). Please bear this in mind when setting markups.
Just as a reminder, if you set markups for categories in the Products category, that setting overrides the settings in the Markup category.
If the prices you see in the Store Price column (and subsequently on your website) are different than what you think they should be after you set the markups in the Markup category, please check the following:
- Does your supplier have any products with MAP (Minimum advertised price)? If your supplier has MAP for certain products, and the price with markup is lower than MAP, then MAP will be used instead of the price with markup. This is a feature we enabled so you wouldn’t be in violation of your agreement with the supplier.
- Did you set the markup for any of the categories, or subcategories? If so, it overrides any settings from the Markup category. Please browse all enabled categories, and subcategories to set them to Use Store Default if you want setting from the Markup category to be used for the prices.
- Is the Use MSRP enabled in any of the categories, or subcategories? If so, it overrides any settings from the Markup category. Please browse all enabled categories, and subcategories to set them to Use Store Default if you want setting from the Markup category to be used for the prices.
For the category markup not to influence markups set in the Markup category all the boxes Use Store Default must be checked.
Also, please bear in mind that every change made in our Dropship panel should be imported to your website, so it’ll take several hours before the changes you made are visible on the website.
Product and Category Management
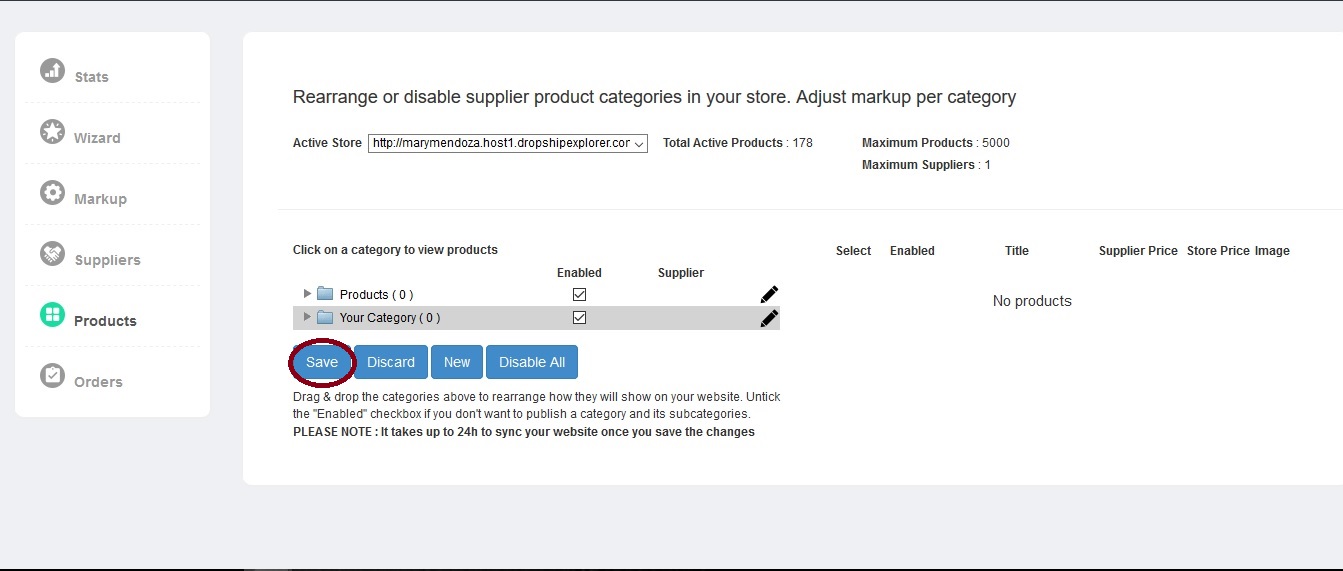
To enable or disable the supplier’s categories, create new ones, enable or disable individual products for your website go to the Products tab of your Dropship Admin Panel.
Enabling and Disabling Categories
If you look at your website you’ll notice that there is only one main category there – Products. However, this can be completely changed. First, click on the little triangle to expand the category tree and see what categories the supplier provided.
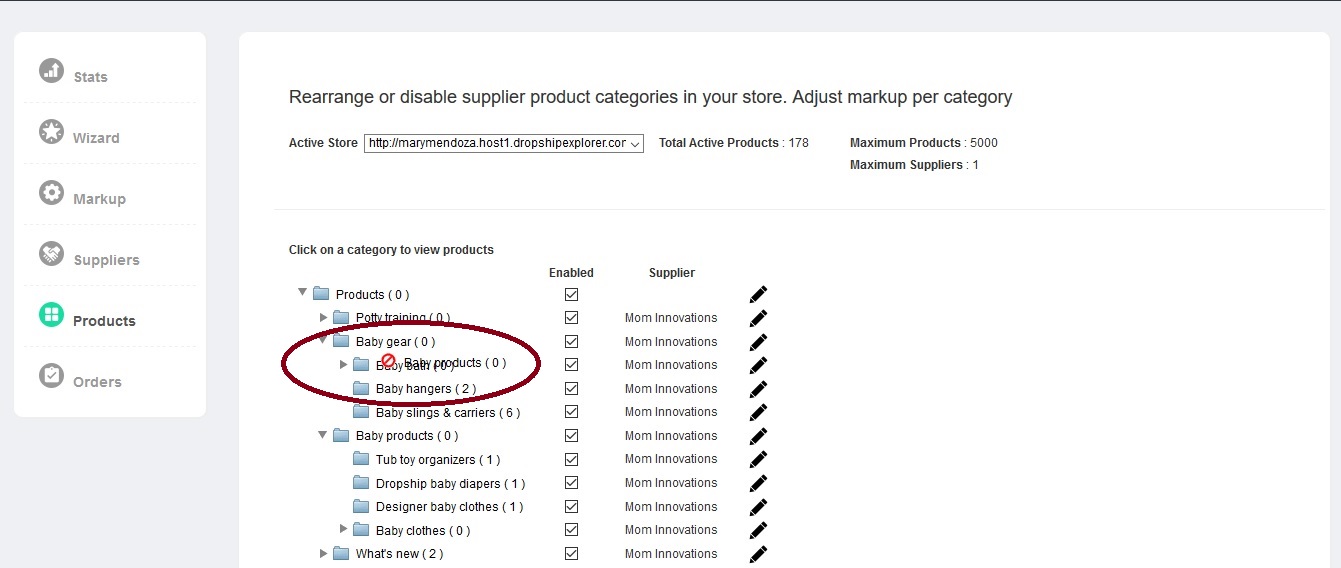
Maybe you’ll like them, maybe not, but here you can change them to the way you want them to look, and you can do it by a simple drag and drop operation.
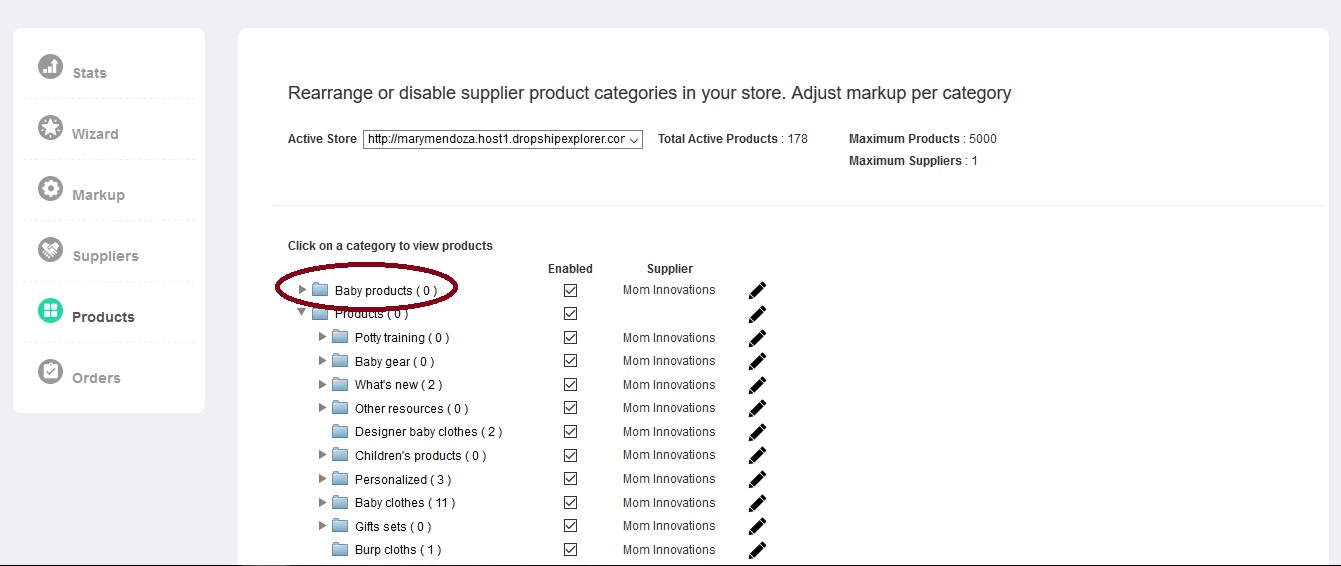
Let’s say that you want to use only one category from your supplier. Just click the category, and without releasing left mouse button, drag it to the position where you want it to be.
Disabling all other categories is just a simple matter of unchecking the Enable box next to the Products category. When you click the Save button, all other categories and the products they contain will disappear from your website and you’ll have only one main category – the one you have chosen.

You can do this for as many categories as you like, and you can even create new ones.
Creating a New Category
To create a new category, click the New button.
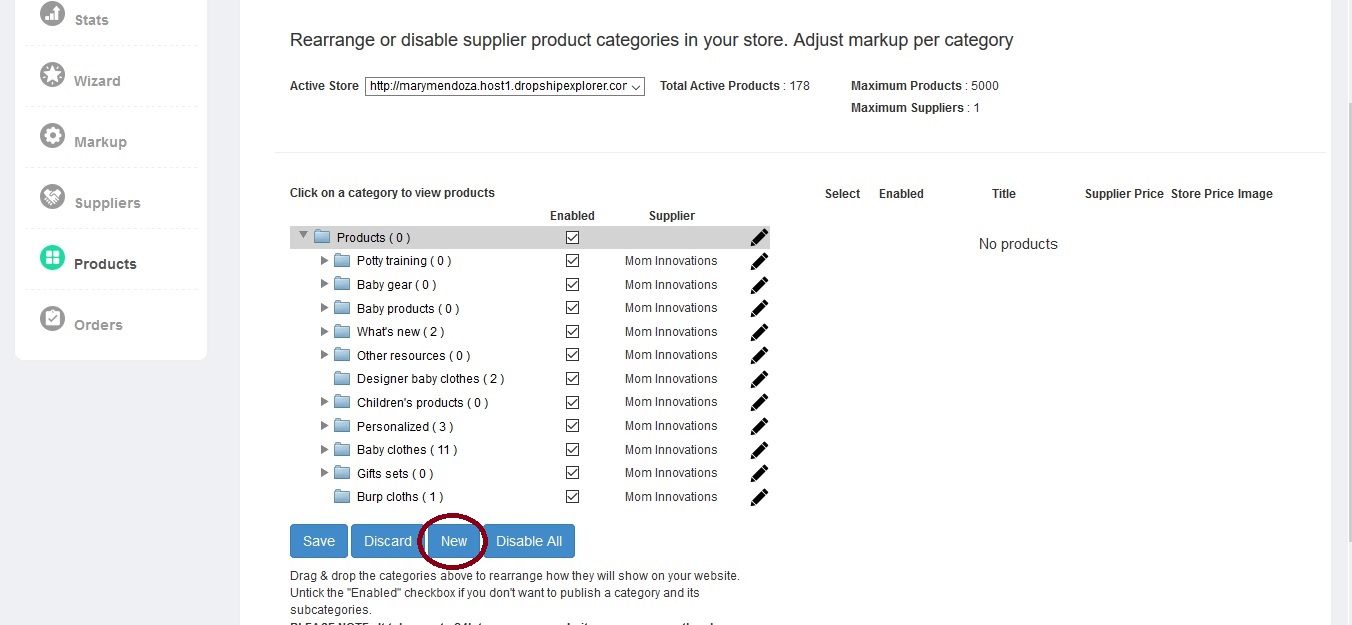
Enter the title for your new category and click the Save button.
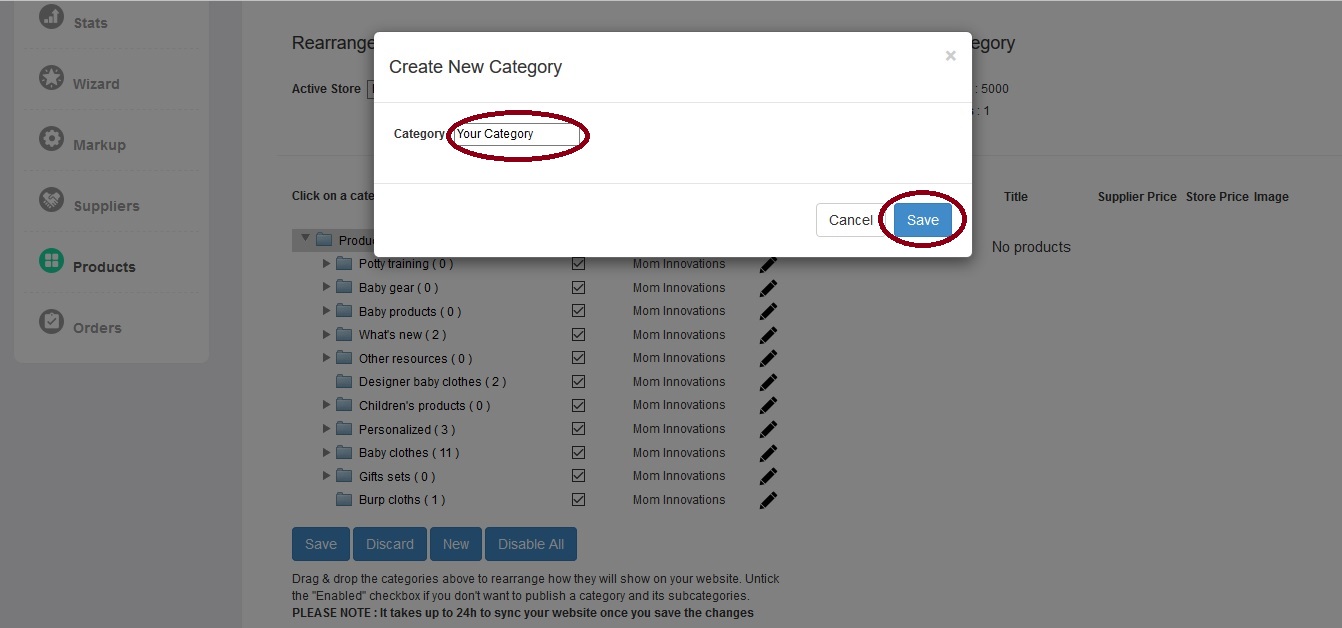
Now your category is part of the category tree.
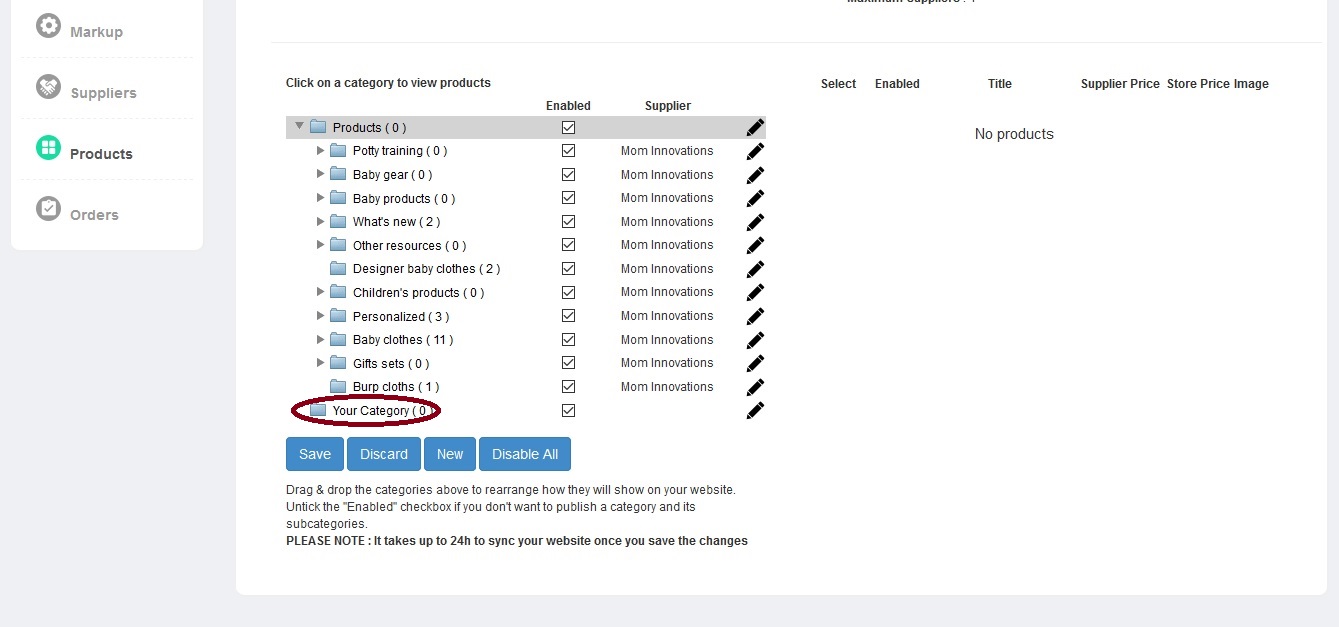
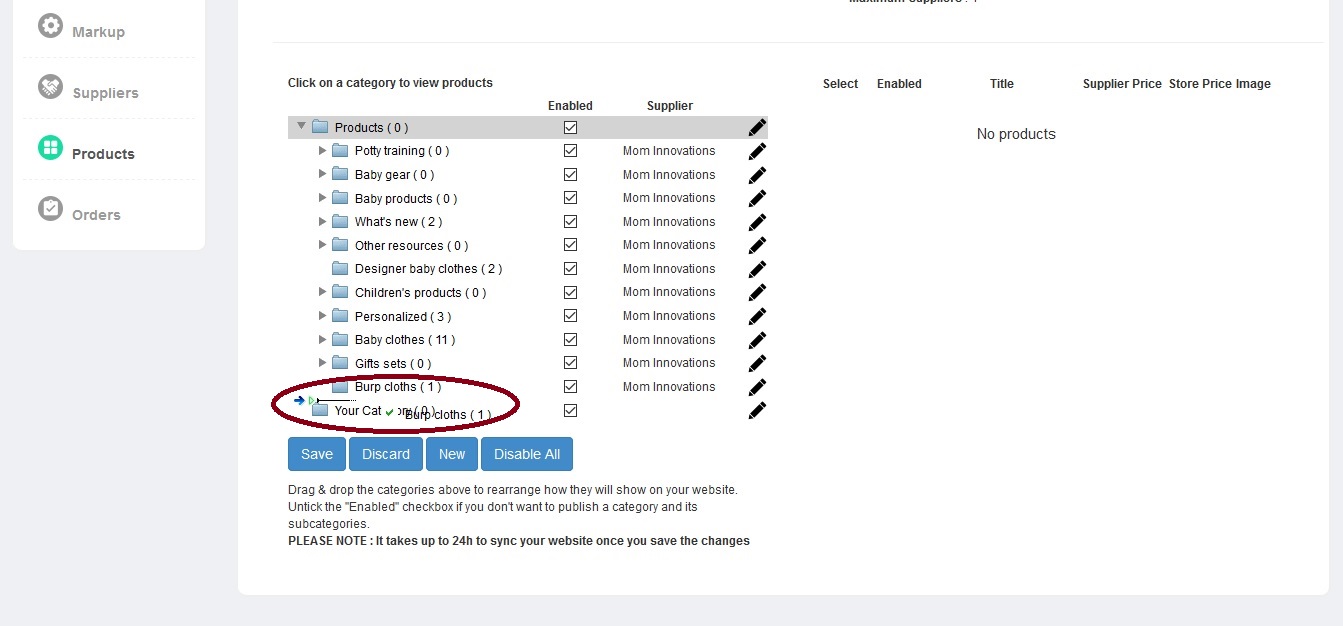
You can drag and drop any of the existing categories into your category.

To delete a category you created, click on the pencil icon followd by the Delete button and the category will be deleted
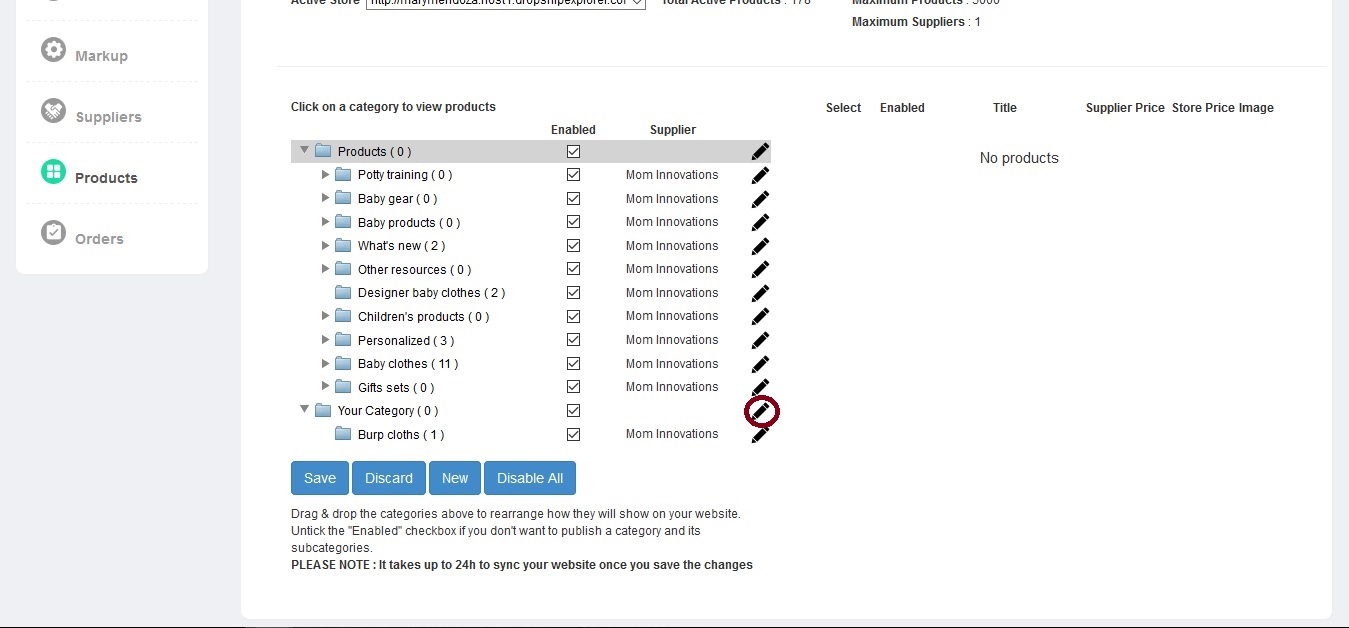
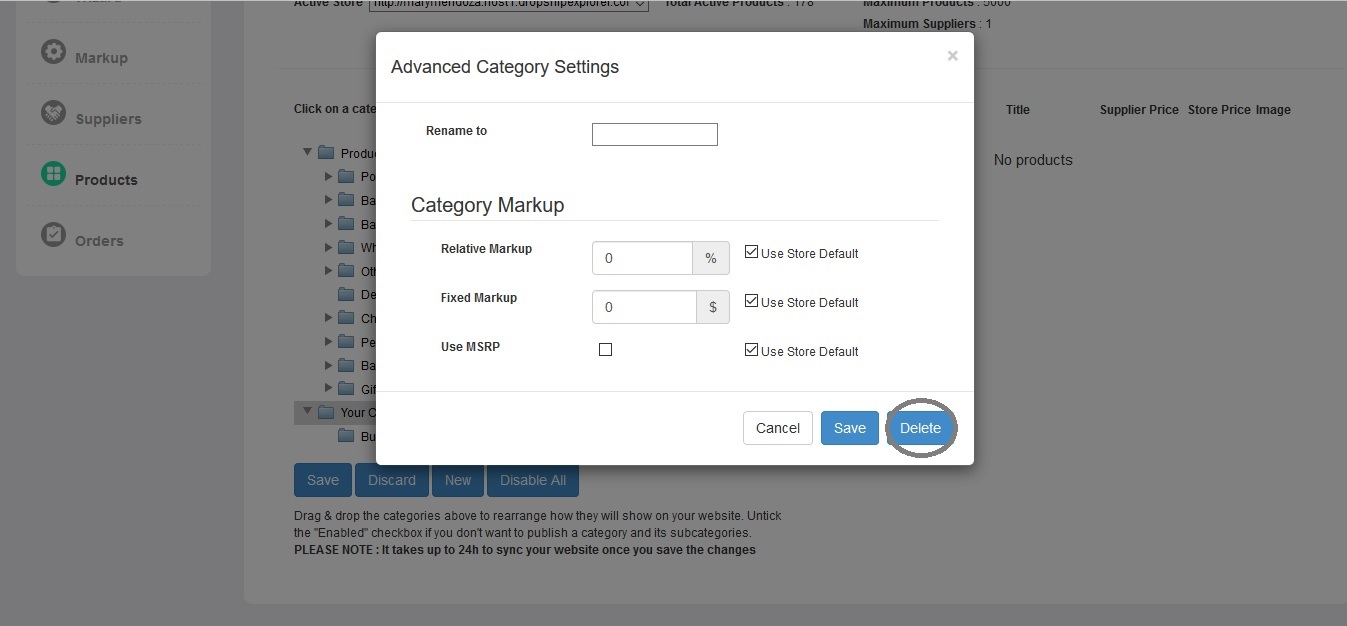
Just bear in mind that all the products from that category will be deleted from your website, too. You can transfer the products you want to the other category, too, we’ll get to that next. Also, no changes on this screen will take effect until you click the Save button.
Another thing to remember is that categories cannot be renamed. However, this doesn’t mean that you cannot have the existing categories with the titles you want. Just create a new category with the name you want and move products from the category you wanted renamed to this new category. After the operation is completed just disable the category you wanted to rename, or delete it. Categories provided by the supplier cannot be deleted, just disabled. Categories you created can be both disabled, and deleted.
Product Management
When you expand the category tree and click on the subcategory with a number next to it other than (0), products within that subcategory will appear on the right side of the screen.

Now you can enable, or disable certain products by checking, or unchecking boxes for certain products.
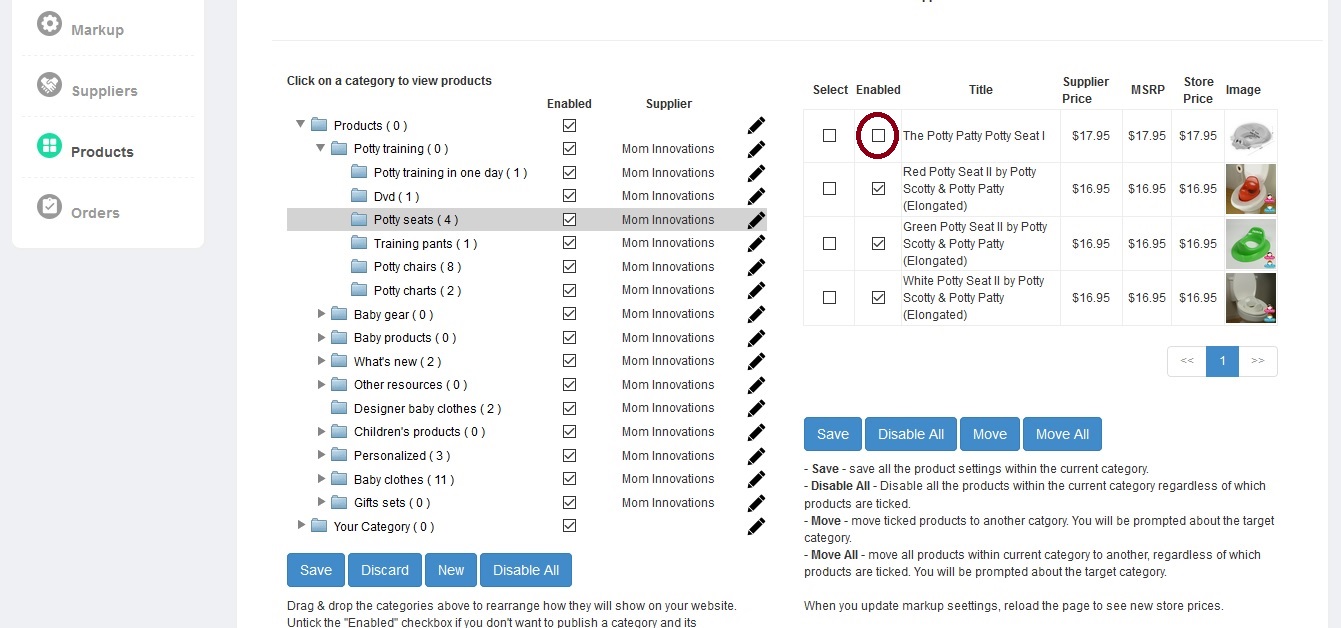
All products are enabled by default.
You can also see a short description, image, Supplier Price, MSRP, and Store Price. Supplier Price is the price towards your supplier. MSRP is Manufacturer's Suggested Retail Price. Store Price is the price that shows on your website. In the dropship panel they change immediately, but it can take several hours for the changes made in the dropship panel to be visible on the website. Supplier Price is the one you’ll be increasing when you set markup, but more on that later. If you want to move one or more products to another category, mark the products you want to transfer by ticking Select check box, and click the Move button.
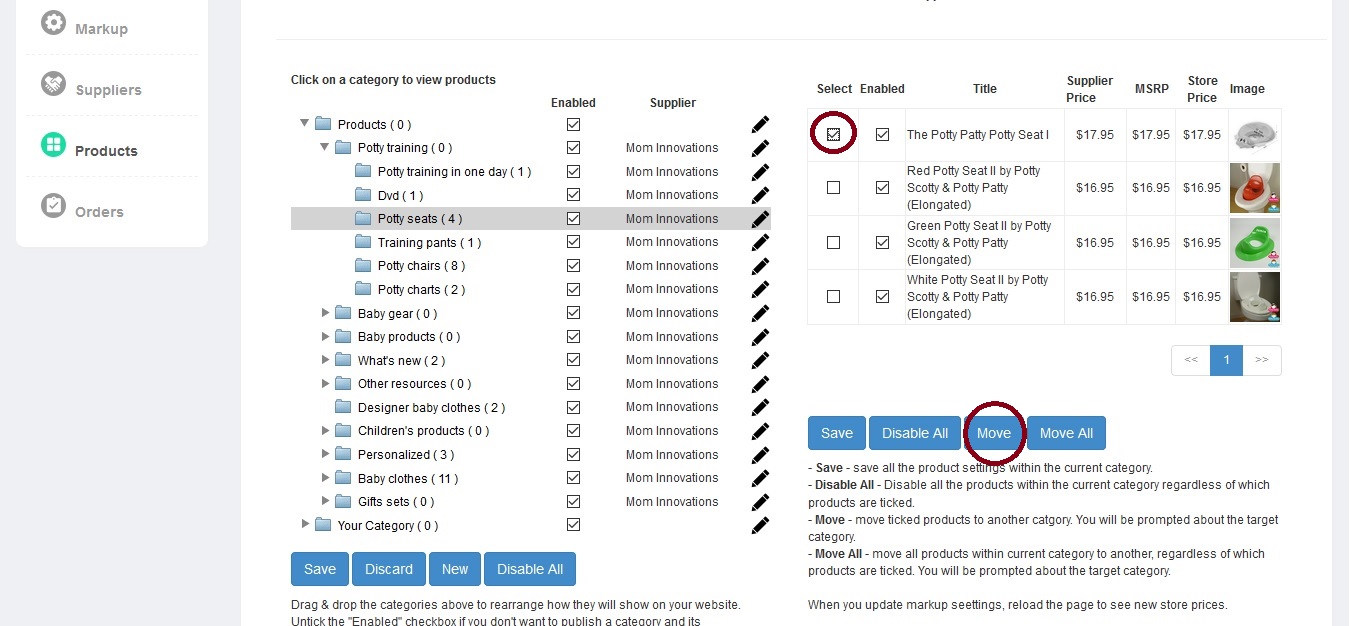
Just click the category where you want to move the product(s), and click the OK button.
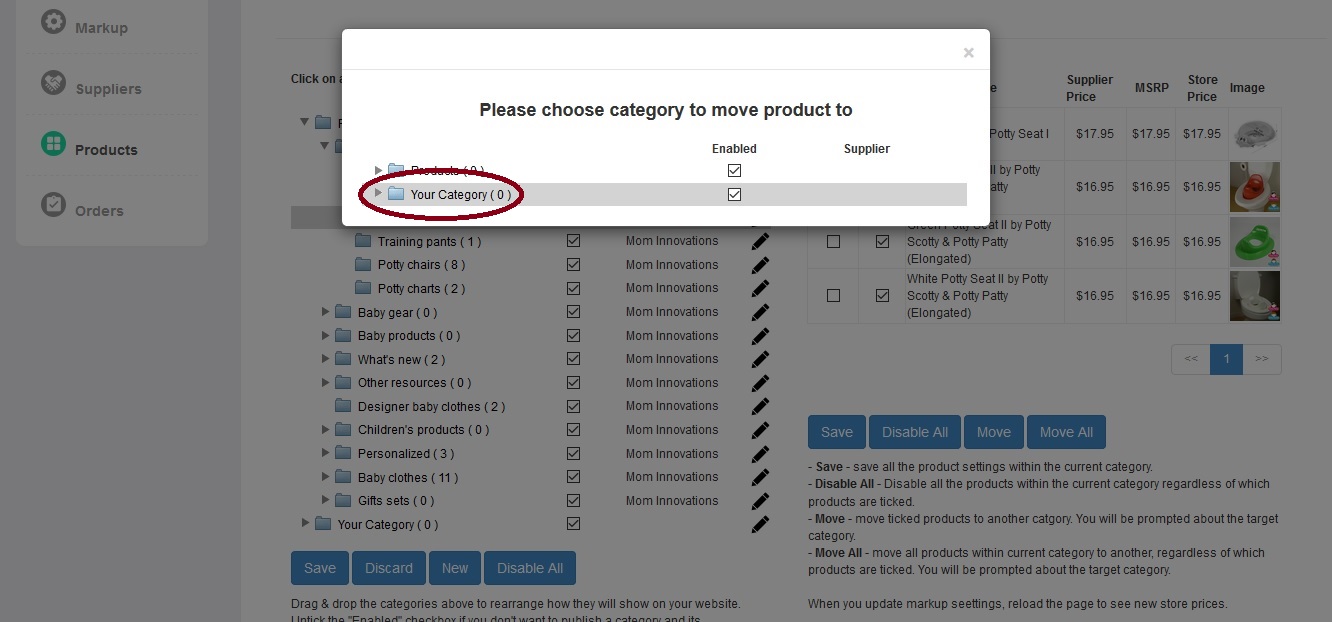
The process is the same if you want to move all the products from one category to another, just select all products and click the Move All button.
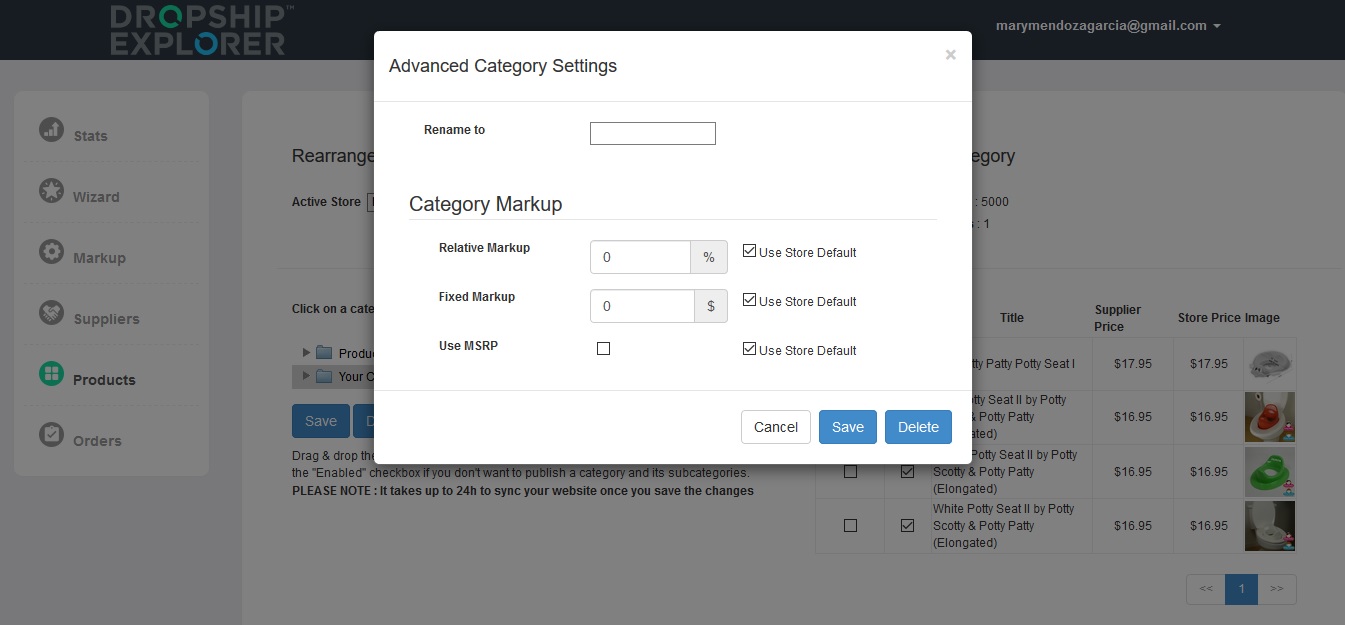
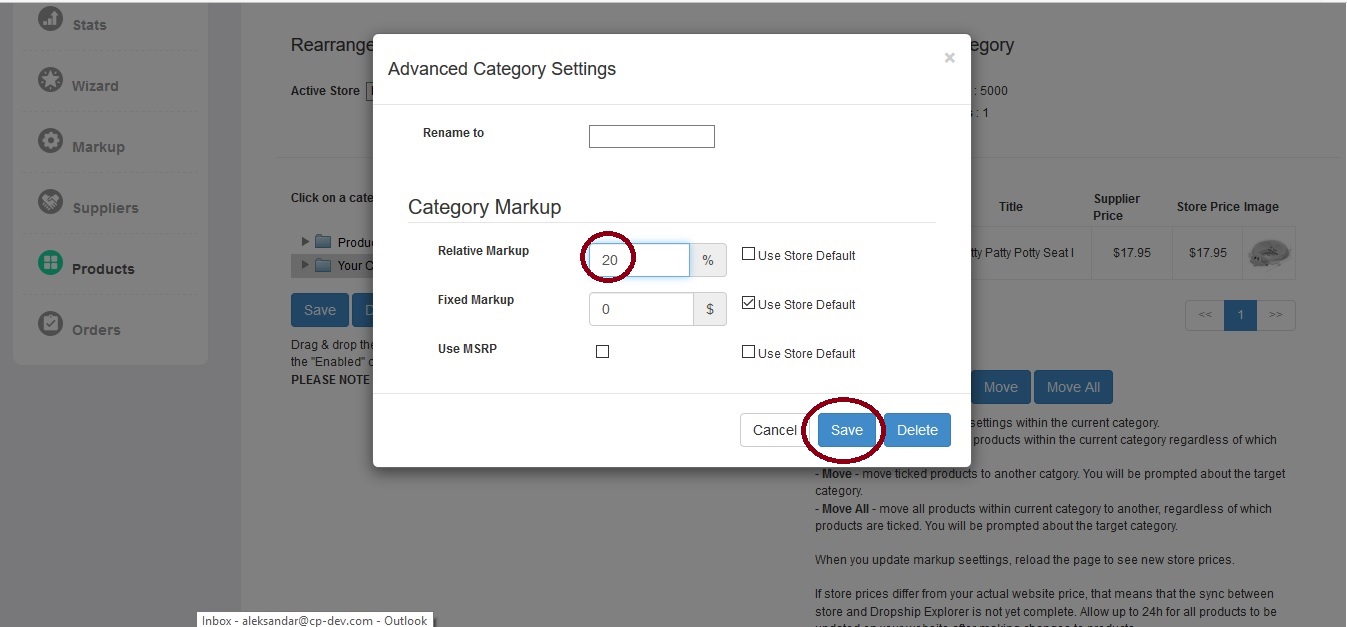
Setting Category Markup
Markups for the entire store and price range are set in the Markup tab, but you can also set markup for each of the categories individually, by clicking the pencil icon.
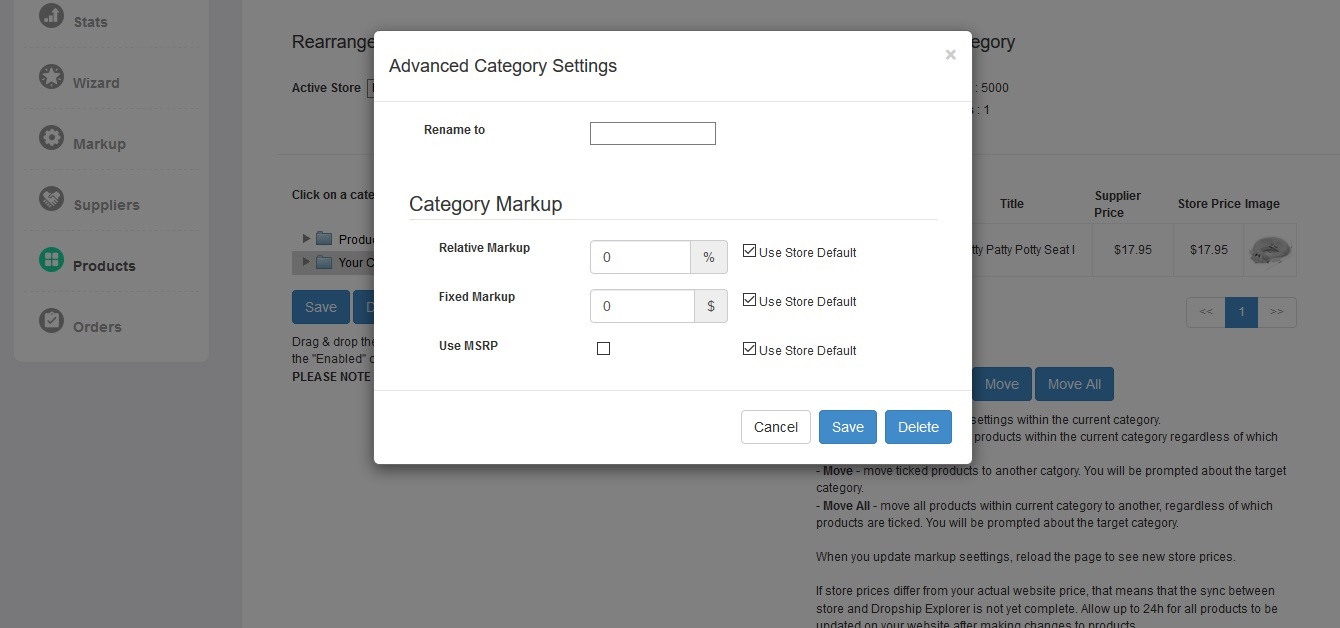
For example, if you sell Pants, Sweaters and Socks in your store, each of these categories can have a different markup. This is particularly useful if you want to comply to different wholesale prices for different product groups (if your supplier have those) or for different suppliers (if you have more than one). You just need to group products and subcategories in certain categories and set different markups as per your preference. As in the markup settings for an entire store, you have the same three options here as well.
- 1. To have MSRP (Manufacturer's Suggested Retail Price) set for the category, just tick the Use MSRP check box.
- 2. To increase prices for 20% for example, enter the number 20 in the Relative Markup box and click the Save button.
- 3. To increase prices for $20 for example, enter the number 20 in the Fixed Markup box and click the Save button.
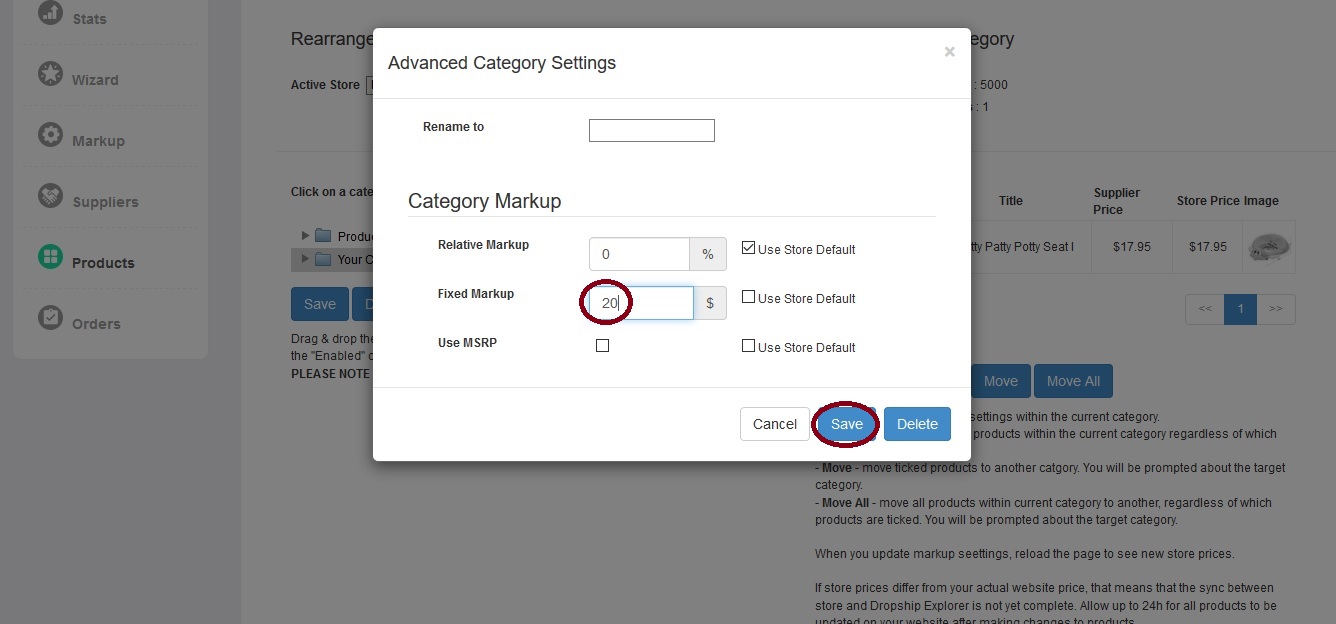
You can set Relative and Fixed markup at the same time to combine them. Just bear in mind that this feature overwrites any setting that you enter in the Markup tab, either Markup per store, or Markup per price range. Price increases that you set here will be reflected on the website, even if you set different Markup per store or Markup per price ranges.